I’m running into an issue with CC4 and Maya and I’m kind of stuck at this point.
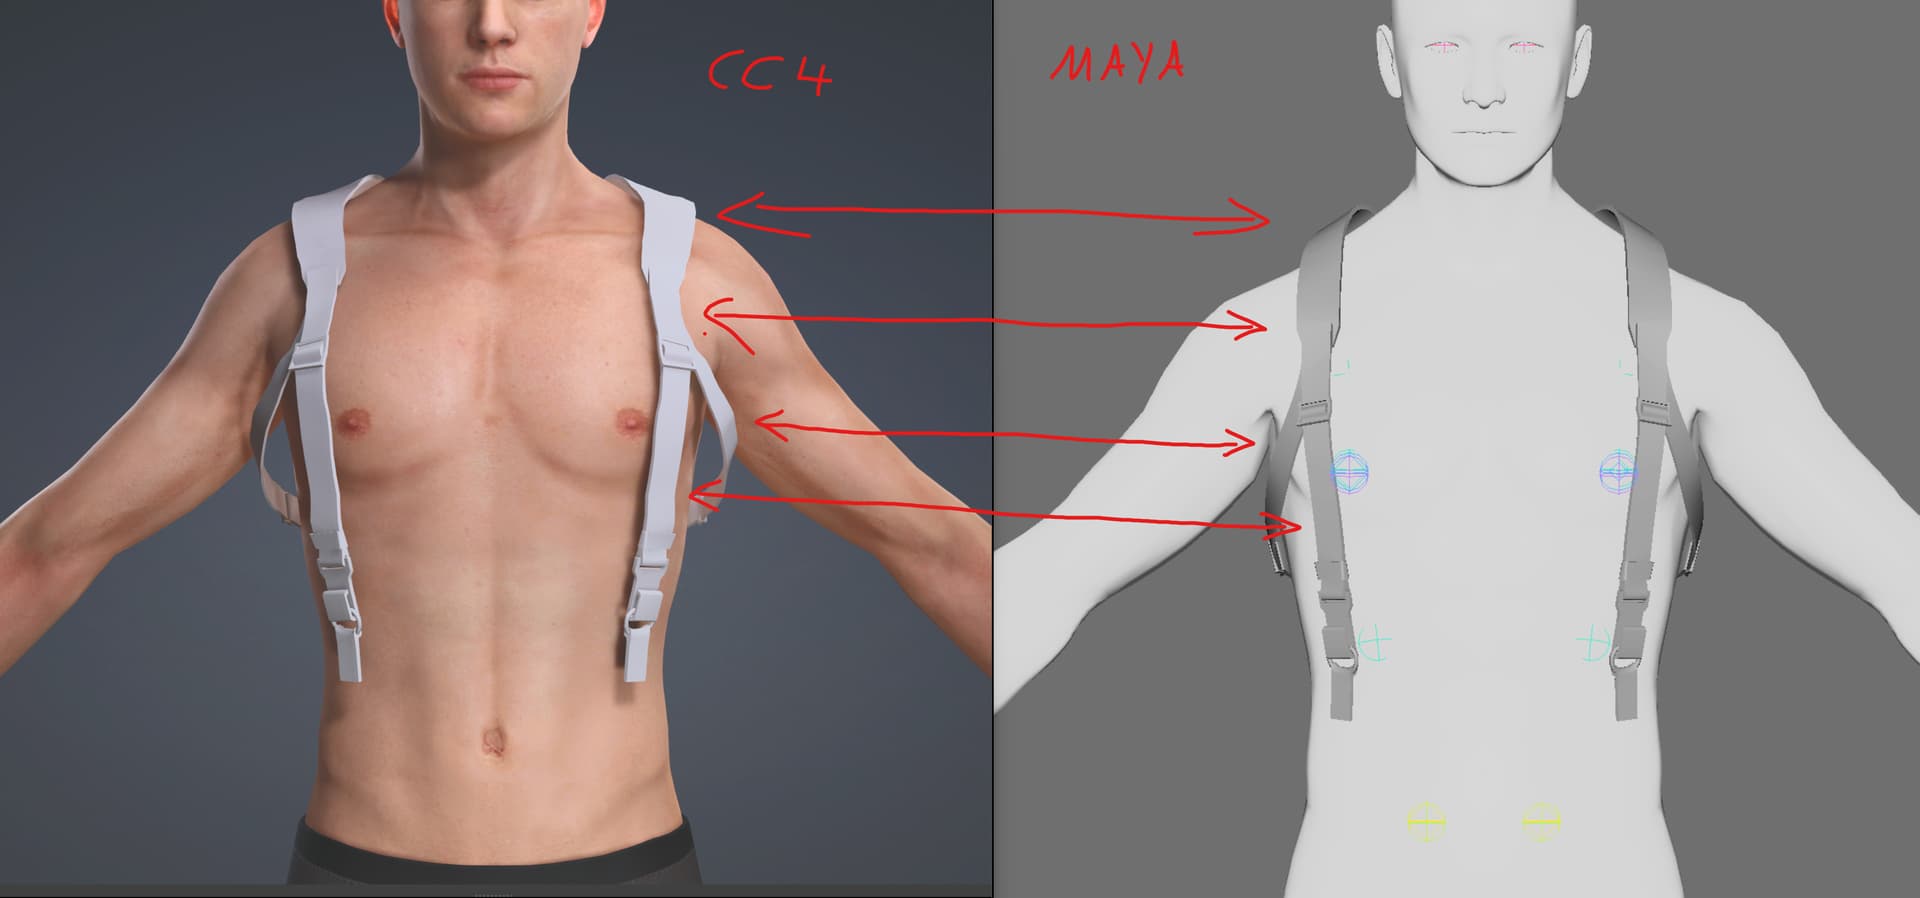
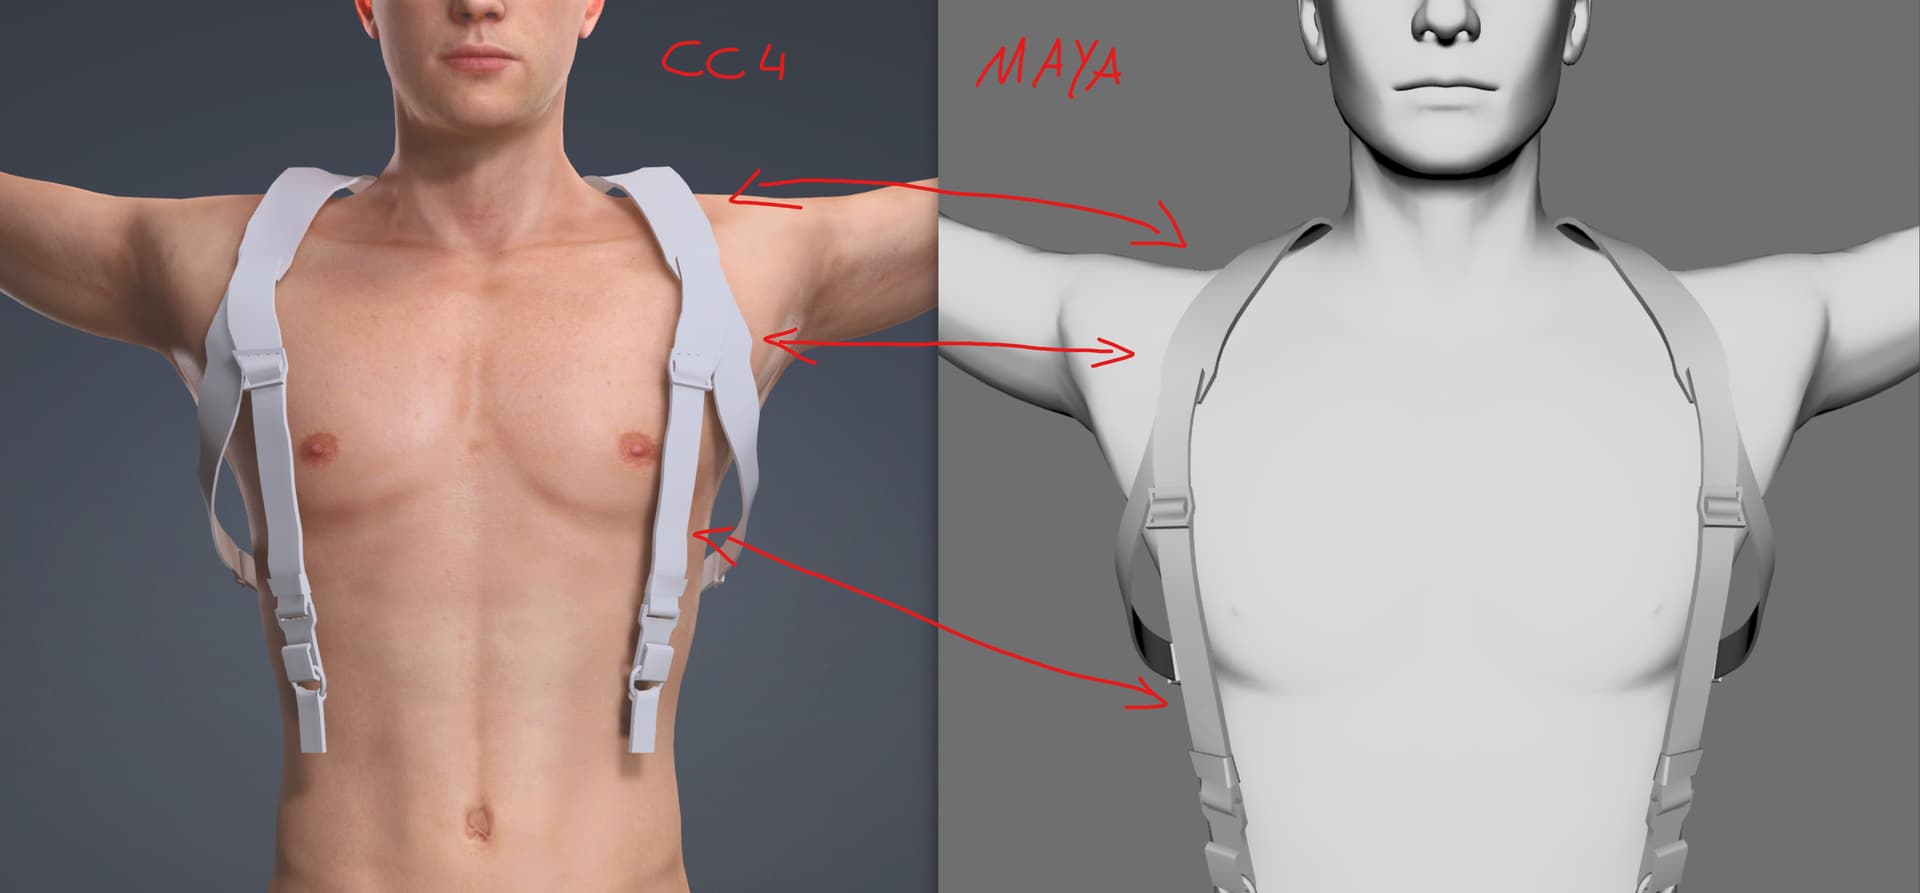
I created and skinned some clothing in Maya. Everything looks correct in Maya, but once I export it to CC4, the deformation is clearly different — same animation, same frame, but different result.
What I originally did:
Imported a CC character into Maya
Adjusted joint orient / pose a bit to get a better working pose
Built and skinned the clothing in that pose
Then put the rig and skinned cloth back into the original CC pose
Exported and imported into CC using the key file
→ Result: No import-errors, BUT wrong deformation in CC
After that I tried to clean everything up properly:
rebuilt the bind pose (including rewriting bindPreMatrix)
restored jointOrient
no more FBX errors on export
→ still wrong deformation in CC
Then I thought maybe it’s the mesh pose:
moved the mesh into the original CC pose
duplicated it
rebound it
→ looks correct in Maya
→ still different in CC
Then I went fully clean:
new scene
imported a fresh, untouched CC rig
imported the mesh already in the correct pose
skinned it from scratch (no copySkinWeights, nothing reused)
→ Maya: correct
→ CC: still different deformation
So at this point I’ve basically ruled out everything:
rig is original
bind pose is clean
mesh is in the correct pose
skinning is freshly done
→ and CC still deforms it differently
The differences are also consistent, especially around the shoulder / clavicle area. It’s very noticeable on straps or tight-fitting elements.
So my question is:
Is it just normal that CC deforms differently than Maya even with a clean setup?
Or am I still missing something obvious?
Is there any workflow that actually gives you a 1:1 match?
Or is the expectation wrong and you always have to tweak weights inside CC in the end?
Hi, I don’t actually work in Maya but in Cinema 4D, but I’m familiar with the problem. I’ve tried various things too, but without success. It got really tricky for me when the characters in CC5 deviated from the standard. It just didn’t work.
However, I always thought there was a Maya pipeline that allows you to exchange files directly between CC5 and Maya? Something similar to Omniverse. It worked well there. Do you use that?
Another thing that occurred to me – is the FPS set to the same value for both projects? Have you tried using an OBJ file?
Well, there is Maya Auto Setup, but that’s a solution to get characters set up in Maya, not the other way around.
Also, it’s mainly a CC5 thing, and I’m working with CC4.
OBJ isn’t an option either, since it doesn’t support joints/bones, skin weights, or animation.
The clavicle joint in particular is causing most of the issues.
When I rotate the shoulder down into a more neutral hanging position, the mesh deforms in a pretty bad way in CC, while the exact same pose in Maya looks perfectly fine.
My guess is that this has something to do with the different character/rig you have to use for external cloth creation.
Then, on import into CC, everything gets converted to a different rig, and maybe the skin gets rebound or weights get transferred, which could mean some information is lost in the process.
I’d love to hear from someone official on this. We can’t be the only ones running into this. If there’s an actual issue, the devs should be aware by now and if not, then I’m probably doing something wrong. Either way, an official statement would be great.
First things first – in my opinion, the physics simulation in Iclone and CC is simply poor and can’t be compared to Maya or C4D. The collision detection, in particular, is dreadful. And the more complex a piece of clothing becomes, the worse it gets.
Have you ever tried recalculating and reweighing the clothing in CC4?
Back then, I always used to start by re-weighting it first. Then I recalibrated it (conform). You can also adjust the distances between the clothing and the avatar there, though you’ll need to experiment a bit with that too.
I’m just wondering whether ‘Skin Weights’ might be of help to you as well? There are a few really good tutorials on YouTube. Put simply, this calculation aligns the garment with the skin.
Yes, I tried reweighting the clothing in CC, and that fixed it. But that is not the solution. I have tons of clothing pieces, props, etc. to skin, all of which need to be weighted together in a single scene so they function properly as a modular set. I simply do not want to do that in CC, as the weight painting tools are very basic and, quite frankly, not very good.
Maya with ngSkinTools, for example, works extremely well and offers far more control for my workflow.
Conform also doesn’t change anything, and Transfer Skin Weights destroyed my custom weights. That might have been an option if this were just a single item, but since I carefully crafted dozens of clothing pieces and props to deform consistently together, using any weights other than the ones I created is out of the question.
I would simply expect weights created specifically for a CC cloth creation character to import correctly. Otherwise, why would creating skinned clothing in external software and importing it into CC be such a heavily promoted workflow if you ultimately have to reskin the meshes anyway?
i also ran multiple times into this problem and unfortunetly there is not really a fix. the internal skin weight tools aren’t good enough, i agree. This was the main reason for me to skip CC on this unfortunetly. But it’s still amazing for character faces and body work.
I do not have Maya, but I can tell that there probably still a flaw in the routine somewhere inside Maya or with export from Maya. I also suggest to ONLY use CC A-Bind pose for designing cloth outside of CC.
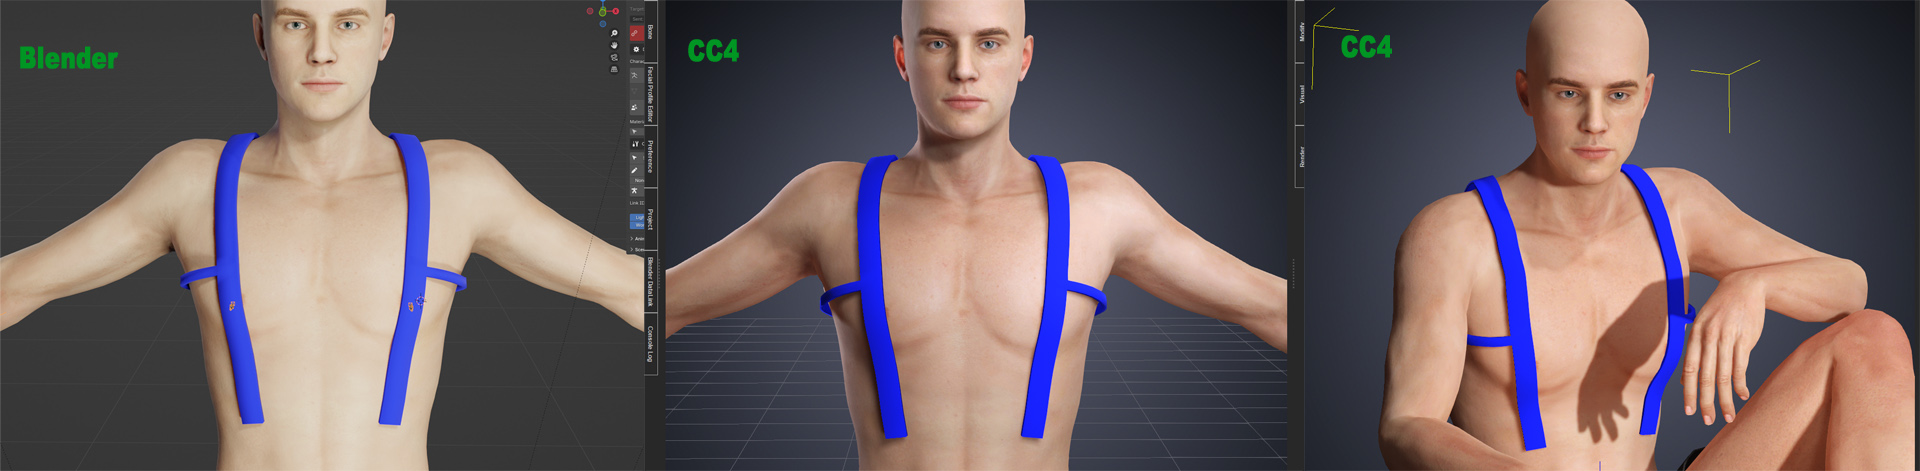
I work primarily with Blender and I only do occasional, minor weight tweaking in CC after importing cloth items designed and rigged in Blender, but only to accommodate for different poses/animations. And it never deforms in CC after the import - always 1:1 match (at least for the same bind pose).
I have not done much lately and figured maybe something has changed in CC with all those updates coming lately. So I did this quick test rigging some sort of suspenders in Blender (with CC A-bind pose) and moved to CC4.
As you may see there is no discrepancy. It holds well even after posing.
That’s interesting.
I do use a very little tweaked CC A-Pose tho.
It’s unchanged except the knees bend a. It more for better cloth simulation and the torso is angle forward slightly.
So nothing clavicle related really.
Also, as mentioned, I did try with a completely basic setup without any changes whatsoever. Open maya, import cc char, import cloth mesh, skin, export, import. Done. But with the same result.
I’ve got a completely different question for you, @DaVader. If you have access to a programme like Maya and you’re using it, why don’t you just carry on working in Maya? After all, shouldn’t the range of options there be significantly more extensive than in CC4 or Iclone?
That’s cause i told him to do. We are together in a team and our idea was to create modular cloth sets, so we can mix them around together in CC4/5, so we can get the maxium vareity out of it + we wanted to sell in store. But meanwhile we think about to skip CC4 cause of the problems we have with the hole import worfklow.
I would try to use a third party app to verify where the issue is.
Import fbx exported from Maya into Blender and see if the issue persists. If it does, then there is a flaw in Maya export. If it does not then the issue is with importing into CC.
I imported the rig into Blender, and aside from a few glitches caused by differences in FBX and rig handling between Maya and Blender, the animation deforms the harness exactly as intended.
There is also a very sudden and strange issue.
Starting yesterday, trying to import any cloth using my keyfiles into CC4 no longer works.
Nothing seems to import anymore. It always crashes at 14%.
No matter which skinned cloth I try to import, nothing works.
Not even importing the untouched Cloth Creation Base Character with its original keyfile works anymore.
Let me be clear: nothing imports into CC4 anymore, despite the fact that all of these cloth assets were imported successfully before without any issues. I already have them inside CC4, saved, and previously worked with. But since yesterday, the exact same files with the exact same keyfiles suddenly no longer import.
Nothing changed on my end.
I already tried everything I could think of:
reinstalling CC4
deleting cache/temp folders
reverting to an older CC4 version (4.66, which definitely worked before)
using the exact same NVIDIA Studio Driver as before
Aside from a Windows update, nothing changed on my system.
I also gave the files to a colleague, and he runs into the exact same issue.
This honestly makes no sense to me.
The only thing that still works is exporting and reimporting a completely fresh character directly from/to CC4 using a newly generated keyfile, including exporting to Maya and importing it back into CC4 afterward. So the general roundtrip workflow itself seems to work fine, exactly as expected and as it did before.
So why would files that were imported successfully before suddenly stop importing entirely?
@DaVader and @Spaehling – OK, I can see your point. However, whilst working with Iclone products, I’ve noticed that, in my opinion, the collision physics aren’t particularly good. I’ve noticed this particularly with clothing. For example, I haven’t been able to find a way to define a shirt as a collision object for the body and for a jacket worn over it. And the jacket as a collision object for the shirt. But that might just be down to my own lack of skill.
As for the FBX workflow, I’ve also found that the exchange between different ecosystems can be very sensitive. Sometimes, even a modified FBX version of the target system (in my case, Cinema 4D) is enough to stop it working as it did before the update.
Have you ever tried using a different exchange format, such as OBJ or the Omniverse format?
Just to avoid any misunderstandings or translation errors, I have a question. When you say ‘rig’, do you mean that you’re adding a Bones structure to the clothing?
Well, I once exported an avatar with a motion from Iclone to Omniverse as a test. It worked well. Here’s the video link:
yes, i have a bone structure exported with the mesh itself.
But even if not, obj wont support skinweights or anything other than geometry, UVs, normals and material assignments as far as i am concerned. So, not suited for skinned cloth objects.