Hey guys. I’ve been trying to figure out the pipeline above for a couple of weeks. Can anyone broadly explain how to approach exporting cc4 to blender for animation using rigify, and then exporting to unity? and more broadly what can and can’t I expect from this pipeline.
Fyi I am pretty new to cc4 and unity but I am a 2d gaming animator for many years and have basic knowledge of blender.
Any help would be greatly appreciated.
I haven’t tried this specific route but is there a reason you don’t want to do the animation in iClone? You can export both to Blender and directly to Unity from CC4 and iClone 8, it seems to be it would be easier to just do the animation in iClone, everything is set up for it when you create a CC4 character.
Through I did manage to create some great animations using Iclone I didn’t find the timeline and controllers to be flexible enough, which is where blender and Rigify shines.
But yeah, it comes with an array of technical difficulties which the addons appear to be built to overcome, hopefully I’ll find how ![]()
That’s a bit of an open ended question. Better questions would be: what are you you trying to do, what do you want it to do and what doesn’t work?
It’s a fairly simple pipeline at it’s core. It basically is just send to Blender, Rigify, Animate, Send to Unity:

1 Like
Hi Victor,
Thanks for the video. It’s looking great but thats not exactly what I’m trying to achieve.
I see you export Reallusion’s template animation, export it to Blender and activate Rigify and exporting to Unity, while not actually animating anything in blender using the rigify tools. So you already have all the action working and baked.
My Question is how would you approach it if you wanted to create a library of animations in Blender using rigify from scratch? So only using the CC4 character in T-pose (or whatever pose) and adding all the animations in Blender.
And to follow your question “what am I trying to do and it doesn’t”- a good example would be the eyes. Using the rigify eye controller will operate the surrounding muscles in blender, but when exported into Unity it will only move the eye bones and not all the blend shapes surrounding it.
I tried baking internally, exporting as actions and NLA but couldn’t get it to work.
I hope I managed to communicate my issue better and thanks very much for being responsive.
It would work no differently. When sending stock animations like in the video, the entire animation is retargeted into the rig. The rig then drives the blendshapes. When exporting, those blendshape animations are baked back into the meshes.
The key thing to realise here is that blendshape animations are not part of the rig, they animate the mesh, and only the particular mesh they are applied to.
In Blender the rig takes care of that for you with drivers and constraints. Outside of Blender it doesn’t.
Following on from the above. If the meshes in the character model you are trying to play the animation on, don’t match the meshes (by name) of the character model animation you exported from Blender, they will not play. The bone animations play, because Unity retargets the bones via its Mechanim humanoid animation system, but it does nothing with the blendshapes.
And this is just blend shape animations in general, not just from Rigify. e.g. If you were to export an animation on Camila, and try to play it on, say, Kevin ActorBuild in Unity, none of the expressions will play. Camila’s blend shapes are animated mainly in the meshes: CC_Base_Body and Camila_Brow. But Kevin actor build’s blendshape mesh is: CC_Game_Body. Even then, the blendshape names must also match exactly.
For CC/iC based character there is the retargeting tool in the autosetup: Advanced Animation — CC/iC Unity Tools 1.3.0 documentation, built specifically to solve this problem.
But if you’re trying to play animations on non CC/iC characters with completely different mesh names and/or blend shape names for expressions, they will not play without some kind of external retargeting solution. Which is beyond the scope of the Blender add-on and Unity auto-setup.
In general you have much fewer problems if you export animations for the same character model you are animating for in Unity.
OK. Thats very useful (and hopeful) info.
I only tried animating and exporting animation from same character/rig, ie from “Boy” (a CC4 character I created) to "Boy’ in Unity- so did not try to mix between characters
Can I assume then that I can only export a rig with its mesh (so exporting “Both”) in order to have both the blendshapes and bones animation play in Unity? Meaning I cannot export “motion” only and expect both blendshapes and bones to play on an already imported character?
In case I’m trying to create a scalable pipeline- create a game where I add, and tweek animation over time, could I export “Both” and then use the exported animation clips in the already used prefab (assuming it is exactly the same character)? Could I go back to Blender to tweek animations if the are saved directly in the Unity project? Could you think of a more economical way for this?
No. When exporting as motion, it also includes all the meshes (and their animation tracks) that have active blendshapes animations.
So motions exported for a character, should play completely on that same character in Unity without any retargeting. If it doesn’t that’s a problem.
What can interfere in this process is name duplication. Blender doesn’t allow it, CC4 does. It’s the biggest source of setup/animation failure.
Blender hangs on to old names, so often you’ll find all your object names are suffixed with .001 or .002, etc. Check that your motion fbx’s have exactly the same object names as the destination character. You may need to rename objects in Blender before exporting.
Exporting both mesh an motion, avoids this problem as everything has the correct and matching name.
You can just use the animations from mesh+motion exports, but, exporting just the motion will achieve the same effect.
Whilst Unity can use models from .blend files, the Rigify control rig is complete nonsense to Unity. It has to be exported via the add-on, because the export function reconstructs a valid character skeleton + animation and exports that instead. The raw Rigify armature and animations are unusable in Unity.
Hey the Victor,
Thanks again for all the suggestions- very much appreciated.
I took some time to follow your instruction and play around some more.
following your instructions didn’t quite work for me. Again shape keys did not export even when I used a regular template CC4 animation:

In this video you can see that there is a difference between the source animation in the CC4 and Blender vs the imported animation in Unity- again, no eyebrow movement, no mouth shapes etc.
Playing some more with the rigified character I finally did manage to export both armature and shape keys from blender only after I pushed them down as NLA and exported in the same way you did in your video, only it exports it as a single NLA. I still didn’t manage to make sense of this pipeline entirely but it’s step in the right direction. Now I kinda manage to export motion only.
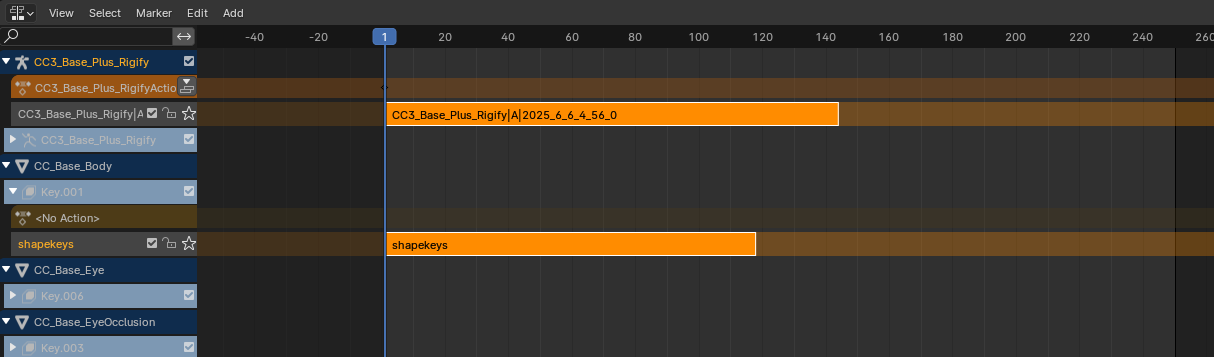
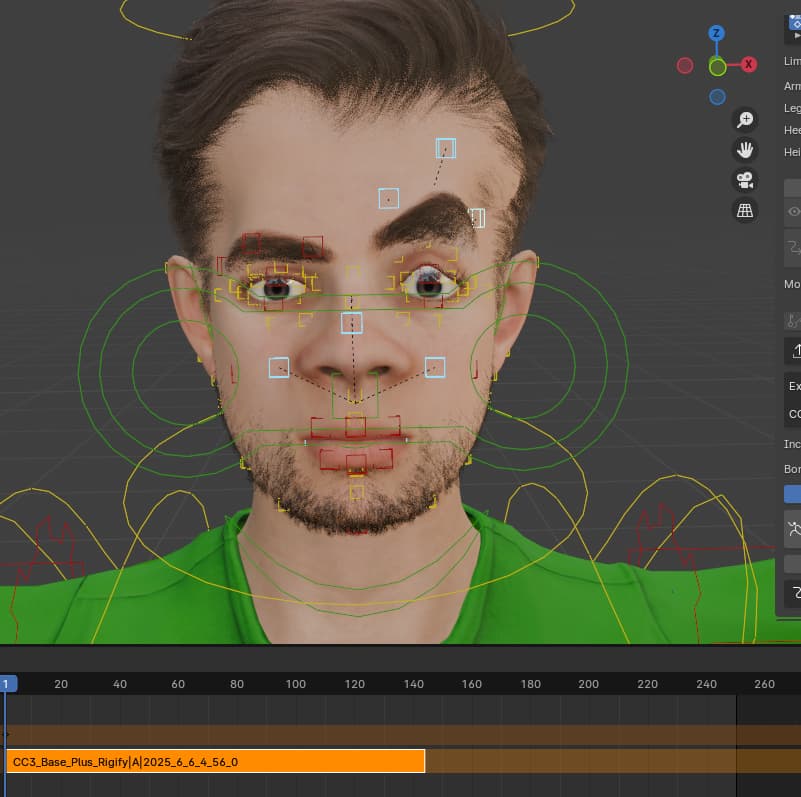
what I absolutely didn’t manage to do is to export are those rigify controllers (red boxes) that you can see deforming the mesh, not as actions nor NLAs
Any suggestions regarding this?
Do the colours of the facial controller have any meaning (yellow/red)?
Many thanks again for your time in answering and assisting me through this.
Oh… That’s a big fat bug right there.
It is in fact meant to do exactly that, push the shape key action tracks onto the NLA to bake and export them, but it was baking empty tracks.
My little example worked because it was using the new expression rig in 2.3.0, which overrides all shape key actions.
No, they are not exported. They are part of the Rigify control rig, and as they are not part of the standard humanoid skeleton, they won’t be used in Unity’s humanoid animation system, so they are not exported. (I can include them in the export if you really need it, but Unity still won’t use them, unless you use Generic animations).
You might be better off upgrading to 2.3.0 and using the new expression rig. (You would need to manually install the 2.3.0 CC4 plugin, and remove any previous versions)
But first I will push a new version of 2.3.0 that fixes the older rig type exports.
Usually in Rigify, red means IK, green means FK, and yellow means ‘Special’, but for the face I think it’s just to differentiate the groups.
As always, thanks for the quick and through reply.
Yeah I did noticed some changes in your Blender Auto Setup UI compared to mine so I thought this might be a version issue. I just had a look at the new Blender Auto Setup video you posted and… wow. It looks incredible.
I assume all these controls are transferable to Unity and I cant wait to test them.
I am tempted to ask how do I go about using it as Generic, as this flexibilty can enhance character performance, I assume retargeting is needed? But maybe for now I’ll focus on mastering the built options available which seem pretty amazing and get to it later.
Ok, thanks, do I wait for an update in the relevant thread before installation?
Thanks for the incredible work and your availability.
Hi again Victor.
I finally got around to test the new addon and it works great. All bone and shape animation exports as should without need for baking, pressing down/NLA etc.
However I did come across some difficulties with exporting motion only. The imported file does not import the animation and when converting to Humanoid and I find only Avatar. Exporting this action as “Both” does export the action and I can use it on the original prefab, which is a step forward.

While I’m at it, I have a few further question:
- Why doesn’t exported action names in Unity match their source action name in Blender?
- Can I change the export FBX file name (say from CC4- cc4 Base… to a more useful name)? I’m being extra careful not to break anything.
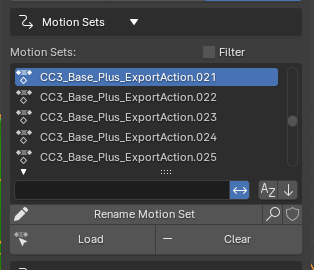
- What is the use of the “Motion Sets” menu and the Filter checkbox.
- Is it possible to export actions in batches? And If so how?
- Is the Unity animation directly linked to the Blender in case I needed to tweak it, and if not, do I need to re-export it after tweaking? Are there any specific guidelines for this?
- How do I select a single animation from the action list to export?
Sorry for the mass questioning, I’m trying to perfect my pipeline before getting into serious work.
Many thanks for all the help this far.
1 Like